Getting Started with Your Model Trains:
So, you’ve bought a train set, gotten it set up, and have everything running. While the sets are exciting and a lot of fun, if you are like many others just entering the hobby, after some time you’ll get the itch to expand your initial set into something a bit bigger.
But how?
That’s where this article comes in. Here we will touch on the basics of O Gauge 3-rail track, the different types of 3-rail track, give some basics on layout design, and provide several track plan ideas as well as books with more ideas for turning a starter set into a miniature railroad empire.
Let’s get started!
Types of O Gauge Track:
All O Gauge track shares some common characteristics. All 3 rail O Gauge track has three rails, spaced evenly apart, with the outer rails 1 ¼ inches apart. All 3 rail O Gauge track is configured where the middle rail provides the positive, or ‘hot’ power to the train, while the two outer rails are grounded [the advantage of this system will become evident when building more complex layouts]. With very, very few exceptions, trains made by O Gauge train makers will work on one another’s track.
Most 3 Rail O Gauge track is sectional, meaning that the pieces are rigidly constructed in a certain length or curve diameter. All types of track are made in a variety of curve diameters, and all lines offer a variety of switches [the track sections that allow two tracks to diverge or merge together] and crossing sections. Some manufacturers also offer flexible track sections, which can be bent to a variety of curvatures.
However, the different types of track normally do not hook together without the use of adapter tracks. The differences are due to the level of detail the track has and its method of construction. In the late 2000s, there are seven major types of O Gauge track on the market.

Lionel has three types of O Gauge track: FasTrack, O, and O27.
FasTrack: introduced earlier this decade, has become Lionel’s primary track line and is now standard in all Lionel train sets. It is the first complete new track system Lionel has introduced since 1957, and has rapidly gained popularity due to its ease of assembly, good looks, and large variety of available pieces. FasTrack differs from earlier types of Lionel track in having a built-in roadbed, which enhances the appearance of the track by simulating the gravel bed of real railroad tracks. More importantly, FasTrack also clips together in a fashion similar to slot car track, and is ideal for use on a floor or carpet. Of course, it looks great on permanent layouts as well. Our display layout uses FasTrack. If you're also a FasTrack user, check out our guide to Lionel FasTrack.
O Gauge : The granddaddy of them all, Lionel has made O Gauge track since 1915, and today’s O Gauge track looks almost exactly the same as that which rolled off the assembly lines in the 1950s. When people talk about their old train set with its three rail track, this is usually the type of track they are talking about. O Gauge track is all metal, usually with three crossties per section. It uses rounded, removable pins to connect the track sections together. O Gauge track is very easy to work with and can be cut into a variety of lengths if needed. If you want a classic, nostalgic look to your layout, O Gauge is certainly worth a look.
O27 Gauge: One of the most common questions we get at Trainz is ‘what is the difference between O and O27? Well, here we go: O27 was introduced during the Great Depression as a means to make train sets less expensive and more affordable. O27 track is the same width as O Gauge track, and is made the same way—all metal, and usually with 3 crossties per section. But O and O27 track do not hook together. The reason for this is despite the identical track width, O27 has smaller crossties and has a lower profile. Also, O27 rails are slightly narrower than O, so the track pins are different sizes. O27 has one key disadvantage—due to its tight turn radius [27 inch-diameter curves—hence the name], not all engines and cars will run on it.
[Note: If you just brought your old set out of the attic and are trying to determine if you have O or O27 track, lay a piece of the track on a table. If you can look through the bottom of a crosstie and through to the other side, it is O. If the end of the crosstie has a piece of metal bent down preventing you from looking through it, it’s O27.]
O27 was Lionel’s standard starter set track from the late 1930s until 2002, when FasTrack replaced it. O27 is still available.

MTH Electric Trains has two track lines.
Realtrax : Realtrax is MTH’s primary track line and is included with all MTH starter sets. Realtrax is similar to FasTrack, and it’s popularity was one of the reasons Lionel introduced Fastrack [Realtrax hit the market in the 1990s]. Like FasTrack, Realtrax has built-in roadbed and also snaps together, making it perfect for layouts set up on a floor or carpet. Unlike Fastrack, Realtrax has a blackened middle rail, helping to camouflage it a bit.
MTH includes a CD-ROM with Realtrax layout design software in every set. We used this software to produce some of the layouts seen below.
Scaletrax : Scaletrax is MTH’s other track line. Designed with permanent layouts in mind, Scaletrax has smaller rails, more crossties, and is very realistic looking. Many hobbyists consider it the most realistic 3-rail track on the market.

Atlas is one of the oldest names in the train business and entered the 3-rail world about a decade ago. Atlas calls their track the 21st-Century Track System, and it is arguably the most flexible of all 3-rail track systems. There are more different types of straight, curved, switch, and crossing sections available in Atlas O than any other 3-rail track. Flexible track sections are also available.
Atlas also offers free downloadable layout design software on their website, and we used it to produce some of the layouts seen below.
GarGraves was the first mass produced, realistic-looking 3 rail track when it was introduced in 1940. Featuring a blackened middle rail and closely spaced wooden crossties, it was the unchallenged king of realistic O Gauge track until Realtrax, FasTrack and Atlas track came along. Despite the new competition, GarGraves remains a favorite of O Gaugers and is a lot of fun to work with.
GarGraves makes sectional track like the other track makers, but when most people think of GarGraves, they think of the 3-foot straight track sections that can be bent into any curve needed. Many of the highly detailed layouts use GarGraves. It works much better on permanent layouts than on temporary floor layouts.
GarGraves produces the standard line of switches and crossings, and another company, Ross Custom Switches, makes GarGraves-compatible switches for just about any dimension you can think of.
Developing a Track Plan:
The best advice we can provide is this: PLAN YOUR LAYOUT BEFORE BUILDING IT.
Taking the track out of the box and ‘winging it’ can be fun, but there is nothing more frustrating than getting your track almost set up, and then realizing you’re one straight track short, or that you bought a right-hand switch instead of a left. Planning is good. It ensures that you have enough track [as well as making sure that you do not buy too much], and that the buildings, track side accessories, and other layout fixtures will fit on the completed layout. And with the new track design software available, it’s also pretty fun. The first thing to decide is what track design you like. Model railroad layouts fall into five basic types:
► Loop [Continuous] Layouts

This is the conventional layout plan, where the main line is arranged in a continuous loop, and the train starts in one place, turns a lap, and eventually ends up back where it started. Many times the loop is folded over itself, creating a figure 8, and parts of the loop can be elevated to pass over each other. If you like getting the trains cranked up and watching ‘em roll, the loop design is a great choice.
► Point to Point

Loop layouts have one disadvantage. If you want to make your layout resemble the real thing, and you’re not modeling the Walt Disney World Railroad, you’re going to be hard-pressed to find a real railroad that runs in a circle. Real railroads are massive transportation factories, moving people and goods from this spot to that spot, in [usually] an efficient manner. Many modelers like to build their layouts to simulate this action. This is known as operation—making a model railroad imitate the operations and schedules of a real railroad. The point-to-point railroad is the most realistic model railroad design. The trains move from Point A to Point B, usually making stops along the way.
Model railroaders working in the smaller scales [HO and N] often build point-to-point railroads. But in O scale, there is a problem. It’s hard to build a true point-to-point O Scale railroad that provides a reasonable length of travel for the train. Unless you have a gymnasium available, building a true point-to-point layout in O is normally out of question.
► Loop-to-Loop

So what to do if you want something a bit more interesting than a loop layout, but do not have enough space to build a point-to-point layout? Do what model railroaders have been doing for years—cheat a bit.
Loop-to-Loop is a variation of the continuous loop layout that hides the continuous nature of the operation. The train moves from point A to point B, but both points have reverse loops that turn the train around and send it back from point B to point A without stopping. Often, on loop-to-loop layouts the reverse loops function as terminals and have yards built into the reverse loops. Loop-to-Loop allows for a layout to be run either as a point-to-point layout for realistic operation, or as a continuous loop layout for display or showing off.
► Out and Back

Another popular design in the smaller scales, the out-and-back is a clever design that sends the train out of its starting point, and at some point it reverses direction and returns to its starting point going in the opposite direction. Many out-and-backs have a continuous operation feature built into them to permit the train to make several laps and ‘build up some mileage’ before returning home.
► Point to Loop

A hybrid of the other four layout types, Point to Loop is a continuous loop layout with two spur lines functioning as starting and ending points for the railroad. This design and the out-and-back are often used if the train room dictates the construction of a narrow shelf on one side.
Deciding on a Plan:
Several factors go into developing a layout plan.
First and most important is to ask yourself ‘what do I want my trains to do?’ If you want lots of trains moving at high speeds for hours on end, you’ll want a very different design than someone who wants to model a short line with slow moving trains.
Second is to decide on the type of track you want to use. While all O Gauge track is similar, the different manufacturers make different curve diameters available. For instance, the minimum curve diameter with FasTrack is 36 inches, while with Realtrax, it’s 31 inches. Therefore, a 180-degree turn with FasTrack is going take up almost an extra half a foot of real estate.
The third consideration is the layout room itself. Layouts usually share space with household items like water heaters, doorways, windows, workbenches, cars, etc.
Track Plans:
Now the fun begins. But first, a quick note about the designs:
These layouts were drawn using two types of software—MTH’s Railware software for Realtrax, and Atlas O’s Right Track software. Unfortunately for FasTrack users, Lionel has not yet released track design software for it. If you are using FasTrack, the layouts will need to be refigured a bit.
These plans are very accurate, but some spots, particularly in yards, may not fit exactly as we have them in our plans. Places where there is a 4.25 inch section may require a 5 inch section, and so on. We intend for these plans to serve as starting points and inspiration [feel free to borrow/steal these ideas as much as you want].
Now, onto the plans:
Small Layouts:
► The Double Loop RR

This simple but fun line uses one pair of switches, a 90 degree crossing, and a few more curved and straight track sections in addition to what is included with a starter set. The train can take two different lines with a ‘junction’ at the crossing.
Dimensions:
MTH Realtrax and conventional O Gauge track: 6 by 6 feet
FasTrack: Approximately 7 by 7 feet
► The Twice Around RR

One of the most popular additions to a train set is a trestle set, allowing the train to climb and descend grades and cross over itself at some point. The most popular form of over and under layouts is a figure-8 configuration, but this plan has some advantages over a figure-8. For one, it takes up less space [if you’re using FasTrack] and actually provides a slightly longer run for the train per lap. Also, on over-and-under Figure-8s, much of the track on the grades is in the curves, increasing the chance of an accident. In this plan, more of the grades are on straightaways.
Dimensions:
MTH Realtrax and conventional O Gauge track: 4 by 8 feet
FasTrack: Approximately 5 by 9 feet
► The Double-Back RR

A neat plan using 3 pair of switches, the Double-Back provides a variety of routes for the train to take. The reversing loops allow the train to change direction. The rear passing siding can also be used to store extra cars.
Dimensions:
MTH Realtrax and conventional O Gauge track: 4 by 8 feet
FasTrack: Approximately 5 by 9 feet
► The Phone Booth Terminal RR

Nicknamed after the old college prank of cramming people into a phone booth, the PBT pushes the maximum amount of action that can be placed on a conventional 4 by 8 sheet of plywood. With a figure 8, to spur sidings, a long passing siding, and a variety of routes, the PBT will operate much bigger than it appears.
Dimensions:
MTH Realtrax and conventional O Gauge track: 4 by 8 feet
FasTrack: Approximately 5 by 9 feet
► The Savannah Terminal


This layout is an example of a small operator’s layout that builds several sidings into a basic figure 8. Basically the ST consists of a two-track yard in the lower right, a short industrial spur in the lower left, and a two-track industrial siding [I envisioned a pier scene when drawing it up] in the upper left. The train leaves the yard and drops off and picks up cars at the two stops. Note that the configuration of the sidings makes having an engine with a front coupler essential, in order to push cars into the tracks in the upper left.
Dimensions:
MTH Realtrax and conventional O Gauge track: 5 by 7 feet
Atlas O and FasTrack: 7 by 8 feet
Medium-Sized Layouts:
► The Buford and Eastern


The Buford and Eastern is a basic out-and-back layout. It can accommodate two trains easily, with one parked on one of the sidings while the other is operating, or can provide interesting operation for one train as well.
If running one train, a typical ‘schedule’ would work like this: The train leaves on the lower of the two sidings at the top of the layout, and heads out onto the main loop. It drops off and picks up cars along the way at the short sidings on the route. When it’s ready to head home, the train heads through the diagonal cutoff, reversing direction and pulling into the upper siding at the top of the layout, completing its ‘trip’. The two switches connecting the sidings at the top allow the engine to uncouple from the train, back down the other siding, and connect onto the back of the train to rearrange it for the next trip. This arrangement is known as an ‘escape track.’
Given their bi-directional nature, diesels would work better on this layout; if you use a steam engine, you’ll need to break out the old manual turntable (better known as your hand) to turn the engine around after each trip.
Dimensions:
All makes of track: 5 by 9 feet
Room-Sized Layouts:
► The Spare Room Central Railroad


A mid-sized layout that allows the operation of two trains, the Spare Room Central is intended to fit into an average size spare bedroom, 9 by 9 or 10 by 10 feet. Utilizing the out-and-back principle for getting in and out of the yard at the lower right, the SRC also features a nice mainline run and several sidings, as long as a passing siding along the backstretch. The key feature to the design is the ‘wye’ where the yard meets the mainline. A wye is a three-legged track arrangement that allows engines to reverse themselves without using a turntable. (Look at the track arrangement and imagine turning a car around in a driveway, and you’ll get the idea). On this layout the wye also allows the trains to head on to the mainline in either a clockwise or counterclockwise direction, and to return to the yard without needing to reverse direction. Using a reasonable amount of track—12 switches in all—the SRC gives the feel of a big railroad without the need of investing a lot of space.
Dimensions:
MTH Realtrax and conventional O Gauge track: 9 by 9 feet
Atlas O and FasTrack: 10 by 10 feet
► The Southern Railway


This plan is an example of the impact of using wide-radius curves on a layout. The plan using Realtrax software uses O42 curves and occupies a space 12 by 12 feet. The other plan, however, uses Atlas O54 and O63 curves and takes up 15 by 17 feet [if using FasTrack, use O48 for the O54 and O60 for the O63, and the plan should fit a 14 by 16 space]. Both plans are essentially the same, with a large over and under figure-8 connected to a pair of reverse loops, with a yard at the lower right and some sidings along the way. Also, note how using O54 switches on the Atlas plan allows for the closer spacing of sidings than with O42 switches on the MTH plan. This is a plus in the tradeoff between short and wide-radius track.
This plan leaves a fair amount of open space for scenery and buildings. Instead of using trestles, the over and under component should be built using plywood risers, allowing the up and downgrades to be integrated into hills or mountains.
Dimensions:
MTH Realtrax and Conventional O Track: 12 by 12 feet
Lionel FasTrack: Approximately 16 by 16 feet
Atlas: 18 by 18 feet
► The Pennsylvania Railroad

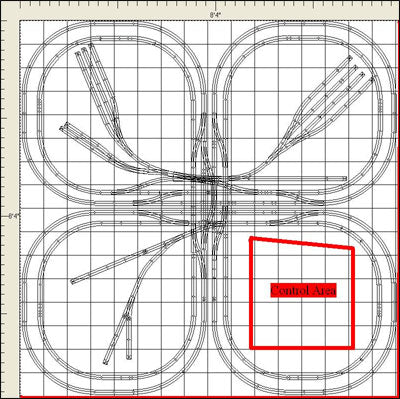
One of the most revered chapters in railroad history was the construction of the massive four-track mainlines by the eastern trunk railroads, particularly the Pennsylvania Railroad and the New York Central System. This plan provides the action of a 4-track main in a reasonable 16 by 16 foot area. Looking more complicated than it really is, the PRR is basically one doubled over figure-8 inside another one. The multiple crossovers allow for moving between the two lines and for trains to reverse direction.
The four lobes created by the loops are used for four different purposes. The lower right is for the control panel and operator’s area [it’s also recommended to leave a 2-foot access way on at least 2 sides, and preferably 3]. The upper right lobe is for a passenger terminal, the upper left is a small freight yard and engine servicing area, and the lower left is a mine or industrial area. With the variety of loops and routes, command control would be a perfect fit for this layout, allowing 2 or 3 trains on each loop without the need for blocks and other wiring complications.
This layout does have a couple drawbacks. First and foremost is that in order to get the vertical mainline over the horizontal mainline, nearly all of the curved sections of the mainlines need to be on grades. Also, the yard areas are a bit small for a layout of this size. It is complex—the Atlas plan uses 32 switches.
But you’ll never be bored!